Your roof is arguably one of the most important aspects of your home. Aside from being one of the most visible parts of a home’s exterior, the roof functions as your essential barrier from all of the elements. Whenever everything is in good shape, this means that your home stays cooler in the summer, warmer in the winter and dry when it rains. A damaged roof can lead to annoying issues, further damage and unwanted exposure to the weather. Because of this, it is important to always have a qualified roofing company take care of any necessary repairs as quickly as possible.
Misallignment[]
A red flag for amateur installations or poor workmanship is shingle misalignment. Looking at a common 3-tab shingle roof, the cutouts, known as slots or keyways, should be vertical and the butted joints should line up horizontally. If you see several areas of misalignment on your roof, you should carefully inspect other components of the roof system for poor workmanship as well. If the flashing and penetrations are in good sh
ape, the misaligned shingles should shed water and will be more of an aesthetic concern.
Starter Course[]
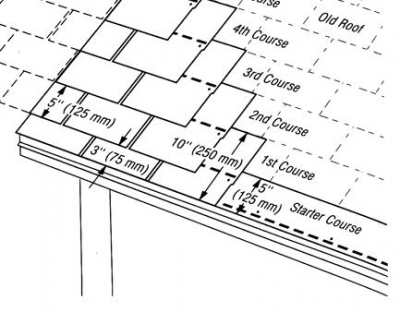
The omission or the incorrect installation of a starter course of shingles is another common mistake, especially on re-roofed houses. A starter course strip must be installed along the eaves to prevent water from penetrating the sheathing under the cutouts of the bottom course of shingles. Shingle starters are standard 3-tab shingles used on both standard and dimensional type installations.
The most common method of installing starter shingles is by using a whole shingle installed with the tabs up and the course offset 6". Occasionally whole shingles are used with tabs down with a 6" offset. Roofers state that they install starter courses in this fashion with good results.
Shingle manufactures recommend that the bottom tabs are to be cut off allowing the self-sealing adhesive to be placed along the bottom of the overlying first course to help prevent blow off. Using a full shingle prevents this sealing along the edge and creates a slight hump under the bottom of the second course that could play a role in ice damming.
On a re-roofing installation, the shingles must nest into the old coursing of the shingles to prevent an irregular appearance on the finished roof. This requires a 5" starter instead of a 7" one. This is accomplished by cutting off the bottom 5" tabs and cutting off an additional 2" off the top of the shingle. This allows for the starter course to nest into the old shingles. To prevent the ends from lining up, the starter course must have a 6" offset from the overlay top course. If you are hiring a roofing contractor for a re-roof, it important to make him aware of the fa
ct that if he does not comply with the manufacturer’s specifications it could influence the limited warranty, but won’t void the warranty for the shingles which are for product defects not installation error.
Nailing[]
Most shingle manufacturers prefer nails to staples. A minimum of four nails or staples per shingle is the usual requirement with the proper nail placement. Incorrect nailing or lack of nails can result in
shingle blow off or shingles slipping. On roofs with a steep pitch or in high wind areas, shingle manufacturers recommend using 6 nails per shingle as well as dabs of roof cement to seal the shingles. Shingles will not self-seal on vertical surfaces, which usually ends in blow offs. A small dab of roof cement under the tabs helps hold shingles down. Fasteners should be located directly above the cutouts and at least 1/2" above them. The nail should not be in the self-sealing strip or above it. Roofers commonly ignore that specification and nail in the sealant. On shallow slopes many roofers nail above the line, “nailing high”. Dimensional shingles usually have a nailing line and nailing high can cause the laminated part to separate during hot weather and slip down. If you see several laminated shingles that have slipped down, it's probably because the installer nailed too high. Fasteners should not be exposed. The necessary exposures, such as the finish ridge cap or bottom flashing flanges, should be sealed over with sealant. Nails and staples should be flush with shingle, but when most roofers use nail or staple guns to install shingles you often see over driven, crooked, or under driven fasteners. Also the smooth shanks on coil roofing nails have been blamed for back outs or nail pops.
Overhangs[]
Another clue to amateur workmanship is inadequate overhang of the shingle. If there is drip edge flashing installed, the overhang can be at minimum ½ “. Without drip edge flashing, the minimum is 3/4". Most roofers overhang 1" on rake and 1 - 1 1/2" on eaves. Insufficient overhangs typically cause water damage to fascia and rake boards. Excessive overhang is also common. When shingles overhang too much, they are more likely to have wind up lift and to blow off. Over time the overhanging shingle will curl over to create an unsightly view and may crack if there is snow and ice build up.
Exposure[]
The exposure on standard 3-tab shingles is typically 5", and it varies with other types of shingles. Roofers sometimes shorten the exposure on shallow slopes to 4", which is acceptable on 3-tab shingles, but it moves the self sealing strip and increases the chance of wind blow off. Shortening the exposure is not recommended with dimensional shingles. Doing so can create voids which increases the chance of wind blow off and wind driven rain backing up under shingles.
Installation[]
Most shingle manufactures recommend installing shingle using the diagonal method Racking, or the vertical method, is also an approved installation method, but can show patterns on a finished roof. This is more noticeable on dimensional style shingles. Roofing contractors often install 3-tab shingles using the vertical method and will install dimensional shingles diagonally.
Ventilation[]
Improperly vented attics or air space inhibits air movement and usually increases moisture content. Under these conditions, heat builds up and shortens the shingle life. Moisture builds up, causing sheathing movement and deterioration, resulting in shingle failure. This factor is a major cause to shorter life of the shingle.
Aging[]
Shingles rapidly age during the first years after installation, some granule loss, minor curling around edges and even small blisters may develop, but all are considered normal. After this stage, the shingles enter a slow aging process that usually last most of the shingles’ life. Shingles may lose more granules, but not a noticeable amount, and surface cracking may develop. After this period, the shingles age rapidly with accelerated deterioration and eventual failure.
Other Problems[]
Check for holes. On steeper roofs the roofers will install a toe board to hold materials and themselves on the roof. After shingles are complete, the board is removed and the nail holes are either forgotten or caulked. The caulk may not be of sufficient quality to last as long as the roof. If the shingles were installed during cold weather, they may not seal down until summer. You may want to point that out to your client, because until shingles seal they are more prone to wind damage. If you hire a roofer to install a new roof, ask them to use roof jacks which are nailed on top of a course and then shingled over. The roof jack can then be removed by lifting it off the slotted hole.